Secure Shell Protocol (SSH) is a cryptographic network protocol that allows secure remote logins over an unsecured network, meaning all traffic is encrypted. You can access your ‘headless’ raspberry pi from your laptop, meaning you don’t need to have a screen, keyboard or mouse attached to the pi. Disclaimer: you will need to connect your pi to a monitor, mouse and keyboard once at the start in order to enable SSH. There is a way to do this headless, but the procedure won’t be covered here.
This tutorial will outline how to access your pi (both from the command line and full desktop environment) from your Windows XP laptop using an ethernet connection.
ONE: Get the Raspbian operating system on your raspberry pi:
TWO: Enable SSH on your pi using the following instructions:
Quick version: hook up your raspberry pi to a monitor, mouse and keyboard, then plug in the power cord. Access the terminal and type: sudo raspi-config. Navigate to SSH and Enable it.
THREE: On your laptop download:
FOUR: Procedure for SSH:
1) Your raspberry pi needs to be on the same network as your computer, so ensure that both are connected to the same router.
2) Find your pi’s IP address using one of two methods:
[Method 1] Using the pi’s terminal:
- Type: ifconfig
- If you’re using ethernet, look for the init addr in the eth0 section; if you’re using wifi, look for the init addr in the wlan0 section.
- Type sudo halt to shut down your pi. Now you can disconnect the monitor, mouse and keyboard because we’re going headless.
OR
[Method 2] Using your laptop:
- Press CTRL+R, search for cmd and press enter. This opens up the command line in windows. Then type: ipconfig
- In the output there will be an address with the word Gateway in it; it will look something like 192.169.1.4. Paste this address into your browser’s url bar and press enter.
- You will be prompted for a username and password. If you don’t know the details to your router, try admin and password. Surprisingly, this often works.
- Click on the menu option, Attached Devices. You will see an entry for your raspberry pi, copy the internal IP address.
3) Open up PuTTY and paste the pi’s address into the “Host Name (or IP address)” bar and click “Open”.
4) You will be prompted for a username, then password. First type pi and press enter, then for the password type raspberry.
5) You will be prompted to change the password. Follow the instructions and don’t forget to write down the new password for safekeeping.
6) If there were no hiccups (there probably were and you found all the solutions, well done!) then you are now accessing your raspberry pi’s command line through your laptop!
FIVE: Accessing the full desktop environment:
7) Type: sudo raspi-config
8) Navigate to “Interfacing Options” and enable VNC. Then exit and type: sudo reboot
9) Now run the VNC .exe file (no need to install).
10) Enter your pi’s IP address, and then enter the pi’s username and password. You will get a security warning, just click continue… and you’re in!
When you need to shutdown your pi, just pulling out the power plug can corrupt your SD card so that you have to re-image it, which isn’t a tragedy but is annoying. To safely shut down your pi, type: sudo halt
Happy piing!

 public class Main {
public static void main(String[] args) {
int [] x = {4, 3, 2, 1};
if ( x[0] > x[3] ) {
int temp = x[0];
x[0] = x[3];
x[3] = temp;
}
System.out.println("Swapping [0] & [3], the array should be 1, 3, 2, 4.");
System.out.println(">> Your code gives: " + x[0] + ", "
+ x[1] + ", "
+ x[2] + ", "
+ x[3]);
if ( x[1] > x[2] ) {
int temp = x[1];
x[1] = x[2];
x[2] = temp;
}
System.out.println("Swapping [1] & [2], the answer should be 1, 2, 3, 4.");
System.out.println(">> Your code gives: " + x[0] + ", "
+ x[1] + ", "
+ x[2] + ", "
+ x[3]);
}
}
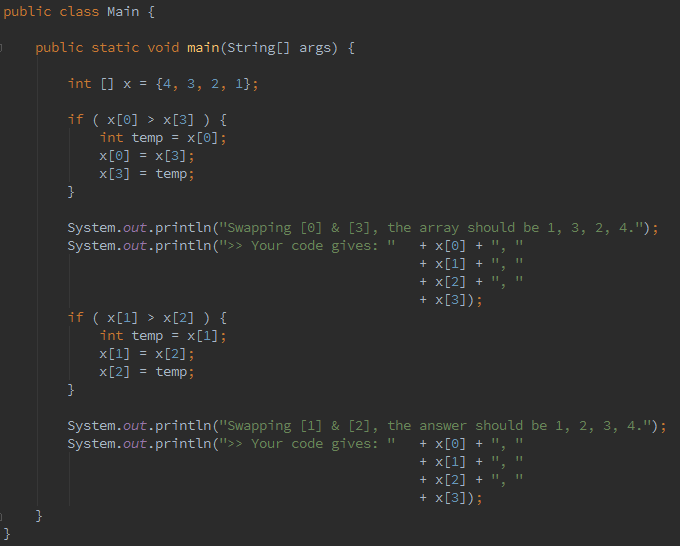
public class Main {

    public static void main(String[] args) {

        int [] x = {4, 3, 2, 1};

        if ( x[0] > x[3] ) {
            int temp = x[0];
            x[0] = x[3];
            x[3] = temp;
        }

        System.out.println("Swapping [0] & [3], the array should be 1, 3, 2, 4.");

        System.out.println(">> Your code gives: "   + x[0] + ", "
                                                    + x[1] + ", "
                                                    + x[2] + ", "
                                                    + x[3]);

        if ( x[1] > x[2] ) {
            int temp = x[1];
            x[1] = x[2];
            x[2] = temp;
        }

        System.out.println("Swapping [1] & [2], the answer should be 1, 2, 3, 4.");

        System.out.println(">> Your code gives: "   + x[0] + ", "
                                                    + x[1] + ", "
                                                    + x[2] + ", "
                                                    + x[3]);

    }
}